NUKA POT PHOTOGRAPHS

0 0
Read Time:18 Second

Check out these photos of our nuka pots, past and present, and some of the delicious vegetables we’ve pickled using this traditional Japanese method.

Nuka pot in a stainless steel bain marie


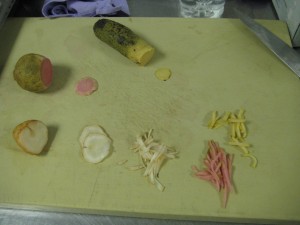
Nuka Pickles: Sunchoke, watermelon radish and green Daikon


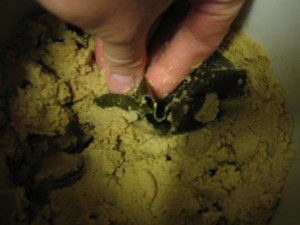
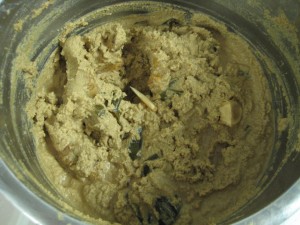
Adding kombu to the nuka mix

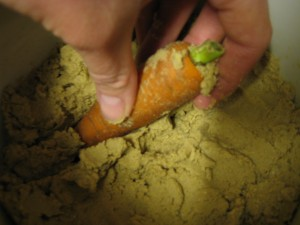
Planting a carrot in the nuka bed

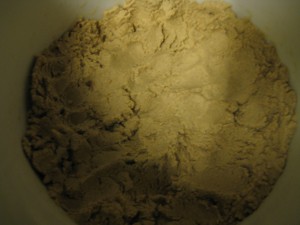
Nuka pot in ceramic crock

Happy
Happy
0 %
Sad
Sad
0 %
Excited
Excited
0 %
Sleepy
Sleepy
0 %
Angry
Angry
0 %
Surprise
Surprise
0 %

CELEBRATE SPRING WITH PICKLED EGGS!

0 1
Read Time:16 Second

Whether you celebrate Easter, Passover, or the sprouting of the daffodils, colorful eggs seem so appropriate at this time of year. Create beautiful little flavor bombs with this recipe from our One For the Season column in the Spring issue of Sweet Paul Magazine. And add some zing to your Sunday brunch this weekend!

Happy
Happy
0 %
Sad
Sad
0 %
Excited
Excited
0 %
Sleepy
Sleepy
0 %
Angry
Angry
0 %
Surprise
Surprise
0 %

DON’T WAIT UNTIL FALL. START CANNING NOW!

0 0
Read Time:1 Minute, 49 Second

This post originally appeared as a blog contribution for Bread & Yoga.

As we near the end of May and the last month of Spring, I start to get antsy to begin canning the season’s new goodies. As a food preservation teacher, I get the most requests for canning workshops in the early Fall – September madness, as we say around my house. It makes sense – to a point. September is when our natural preservation hormones kick in. We scurry about like squirrels, putting up tomato sauce and pepper relish, and the last of the stone fruit preserves – all because we start to feel the imminent winter approaching.

But since we aren’t actually squirrels, it’s important to note that our winter stores can be infinitely more varied. And if you don’t learn to can produce until the Fall, you miss out on the late Spring and Summer bounty. What about the pickled asparagus, ramps, the strawberry and blueberry jams, and cherries, as preserves and sweet or savory pickles? Don’t you want those things in your little winter stash? I certainly do!

Folks often ask me about the nutritional benefits of canning since it requires heat. It is basically the same as cooking your food. If you get produce at its peak freshness and can it immediately, it will have greater nutritional content than if it’s picked and then shipped over the course of a few days to a week before you buy it and eat it raw.

When you preserve food yourself, you also have control over the ingredients. You can make lower sugar jams and jellies, you can pickle produce without chemical additives or colorings. Or you can simply preserve foods that suit your tastes – super spicy, without the garlic, or with spices traditional to your cultural background.

Whatever your reasons for exploring canning, now is the perfect time to get started. And by the time Fall rolls around you’ll be a preservation pro!

Get started with Canning: The Sweet & Sour classes at Bread and Yoga on Tuesday May 27th and Tuesday June 10th from 7-9pm.

For more info and to sign up, click here.

Happy
Happy
0 %
Sad
Sad
0 %
Excited
Excited
0 %
Sleepy
Sleepy
0 %
Angry
Angry
0 %
Surprise
Surprise
0 %

GARLIC CHILI PASTE IN SWEET PAUL MAGAZINE – JUST IN TIME FOR SUMMER!

0 0
Read Time:25 Second


It’s getting hot out there – and in here – with this spicy, tangy Garlic Chili Paste I developed for the One For the Season column in the Summer issue of Sweet Paul magazine. The perfect accompaniment to… well, lots of things! Try it with eggs, perk up a pasta sauce, or take your tacos to a higher plane.

Read the whole column here, and check out all the other amazing articles and stories in the Summer issue.

Photographs by the wonderfully amazing Alexandra Grablewski.

Happy
Happy
0 %
Sad
Sad
0 %
Excited
Excited
0 %
Sleepy
Sleepy
0 %
Angry
Angry
0 %
Surprise
Surprise
0 %

BOOZY PICKLED CHERRIES

0 0
Read Time:1 Minute, 24 Second

It’s cherry season! Go get them while you can.

Pickled cherries are one of my favorite pickles. So much so that I created a Sweet Paul column for them last Summer at about this time.

I was reminded recently that in one of my workshops I had promised a recipe for Spirited Cherries. It is a recipe I taught years ago for Ball at a farmers market in Connecticut. I would make all kinds of recipes in the Ball tent – getting market goers to participate and learn how to can. I went through many different recipes during that job, many of them new to me. It was a great way to expose myself to a bunch of different canning recipes and to find out what worked, what I liked, and what I didn’t, and hear what other people thought of the recipes. Participants often went home with a jar, and I would give extras to market workers and vendors who had supplied us with produce. But I always kept one jar for myself to see the results at some later date at home.

These jars served me well in other classes – I often brought them along to show how a proper seal on a jar should look. And every so often, when it pertained to the subject matter, we would open a jar and taste it. We opened the Spirited Cherries during a Canning for Cocktails class I was teaching at Brooklyn Botanic Garden. Lucky for y’all, Andrea was persistent about that promised recipe, and I’m finally getting it to you here – just in time for seasonal cherries.

Like I said, go get ’em!


Happy
Happy
0 %
Sad
Sad
0 %
Excited
Excited
0 %
Sleepy
Sleepy
0 %
Angry
Angry
0 %
Surprise
Surprise
0 %

PEACH HAND PIES

0 0
Read Time:4 Minute, 19 Second

An alternate version of this post originally appeared in Sweet Paul Magazine.

Stone fruit season is a special time of year – when plums, nectarines, and peaches call out from farmers market stands and beg to be eaten out of hand with juice dripping down my chin. There really is no substitute for a fresh local peach. So while they are in season, I encourage you to eat as many as you can. And when you’ve had your fill, preserve the rest. Or, as they say, “Eat what you can, and what you can’t, can.”

While I was living in Santa Cruz, California, I worked with Erin Justus Lampel, the talented baker behind Companion Bakeshop, to host a jam making and canning class at the bakery. Bread and jam are an obvious and delicious pairing. I developed a couple of recipes for the class and these Spiced Peach Preserves were my favorite. Simple and straightforward, they take the deliciousness of the peaches and dress them up to taste like pie in a jar. They are sweet and tangy and lightly spiced. Spread them on bread to liven up your morning toast, or use, like I did, as a pie filling to remind you of those glory days of fresh stone fruit season after they have gone.

To make things a little more fun (and to make a little bit of preserves go further), I decided to make hand pies. Traveling as a young photo assistant in the South, hand made hand pies were a seldom and sought after treat at small gas stations along the blue highways. Those little pies were the perfect vessel for an assortment of fruit fillings, and a welcome sweet treat as we continued on our journeys.

I don’t eat wheat or dairy anymore, and I took it as a personal challenge to create a hand pie I would be happy to eat. You can use any basic pie dough recipe to create these pies; for the gluten and dairy free version shown here, see the recipe below:

Hand pie dough
-Yields approximately 10 4-inch pies-

I tested these hand pies with vegetable shortening and duck fat. If you can get your hands on duck fat, I highly recommend it to the alternative. The duck fat pies are tastier, flakier, and more tender.

½ cup brown rice flour
½ cup millet flour
½ cup sorghum flour
½ cup potato starch
½ cup tapioca starch
¼ cup sugar
2 teaspoons xantham gum
½ teaspoon salt
4 ounces (8 Tablespoons) duck fat or vegetable shortening
2 eggs, beaten
2 – 4 Tablespoons ice water
1 ½ – 2 cups Spiced Peach Preserves (recipe below)
1 egg white, beaten
sugar for topping

  1. Sift together all of the dry ingredients.
  2. Using your fingers or a pastry knife, quickly cut fat or shortening into the flour mix until it resembles course sand.
  3. Gently mix eggs into the sandy mixture and form the dough into a ball.
  4. Add 2 to 4 Tablespoons of ice water until the dough comes together and is slightly tacky.
  5. Form dough into a flat disk, wrap in plastic wrap and chill for 1 hour.
  6. Preheat oven to 350˚F.
  7. Divide chilled dough into ten equal pieces. Working with one piece at a time, keep the remaining pieces refrigerated.
  8. Form each piece into a flat disk and then roll into a 4 – 5 inch round, leaving the dough about ¼ inch thick.
  9. Spoon 2 -3 Tablespoons of preserves into the center of the round, fold in half and crimp edges. Repeat with remaining pieces.
  10. Brush the tops of each pie with egg whites and sprinkle with sugar.
  11. Using a sharp knife, cut a few slits in the top of each pie to vent steam.
  12. Bake pies on a lined baking sheet for 15 minutes. Rotate the tray and bake for 10 minutes more.
  13. Remove from oven, cool and enjoy!


Spiced Peach Preserves
-Yields approximately 5 8oz jars-

6 cups peeled and chopped peaches
3 cups sugar
2 Tablespoons lemon juice
1/2 teaspoon grated lemon zest
1/4 teaspoon ground nutmeg
1/4 teaspoon ground ginger
1/4 teaspoon ground cinnamon

1. Prepare waterbath canner, jars and lids.
2. Heat all ingredients together in a heavy pan on medium heat until the fruit starts to give up liquid.
3. Turn heat up to high and cook mixture, stirring consistently to prevent burning.
4. Cook preserves until they thicken and test how they gel using the chilled plate test. Do this test by chilling a plate in the refrigerator. Drop the preserves on the chilled plate and see if you can run your finger through them leaving a line in the center of the preserves that doesn’t seep back together. If your line holds, your preserves are ready. If it doesn’t, continue cooking and test again in a few minutes.
5. Remove the preserves from heat and skim off any foam.
6. Ladle the preserves into warm canning jars, leaving 1/4 inch headspace. Wipe rims. Apply lids and bands and adjust to fingertip tight.
7. Process jars for 10 minutes in a boiling water bath.
8. Cool jars and check them for a proper seal.
9. Enjoy!

Click here for a printable version of the recipes.

Happy
Happy
0 %
Sad
Sad
0 %
Excited
Excited
0 %
Sleepy
Sleepy
0 %
Angry
Angry
0 %
Surprise
Surprise
0 %

LET’S GET FARMING!

0 0
Read Time:3 Minute, 10 Second

I am ready for Crock & Jar to start supporting our own farm… I look forward to the day when I can help to sow the seeds that grow into the plants that we will harvest and sell or transform into other masterpieces. I want this seed of an idea to be grown NOW! I long to be on the farm, making delicious value added products with our very own produce, and building new food creations based on the inspirations the farm provides. I am excited to be directly involved in the whole spectrum of seed to plate – to help encourage the connections along that path and to be forever energized by them.”

It’s been a little over six months since I wrote that for my Which Comes First blog post for our farm website, Let’s Get Farming**. And just a couple of days ago, my wife, Jane, our farm partner Lorrie, and our friend Jess planted out the first of our seeds for the coming year. It’s on, everyone! We are officially farming! The next few months will bring a whirlwind of changes – moving ourselves out of New York City, moving Crock & Jar to a new home, buying a car (goodbye subway!), and rebuilding our ties to the land.

Our seed planting was a wonderful window into the community we’re building outside NYC. Our farm group of six is going to be working alongside three other beginning farms of various size in Orange County as part of the Chester Agriculture Center. Three of our four farm groups are sharing a greenhouse this year and we were working there together, building propagation tables and planting out seed trays.

Our Let’s Get Farming team is starting out with three acres – cover-cropping one, and growing intensively on the other two. If you know how much space it takes to grow cabbage, then you will quickly realize that we’re not going to be able to grow all the cabbage that Crock & Jar will need for the year. So we’re focusing on starting small – growing the radishes for the Spicy Kraut, beets for the FAB Kraut, dill for the Pickle Kraut and definitely chickweed for the Wild Chick Kraut.

So this is where the synergy we have as a collection of farms comes in. Our neighboring farmers will be growing on acreage varying in size from six to almost 40 acres. The largest farm group of the three, Verdant Common Growers, is also a group of six – Travis, Valita, and some folks we haven’t met yet. During our seed planting, we talked with Travis and Valita about growing cabbage for Crock & Jar – they are super psyched about it and willing to grow a few different varieties for us. It’s a total win-win situation. We give them a stable sales outlet and they grow us healthy, amazing cabbage – so awesome!

I like to think of it as ripples on a pond. We’ve started as the drop in the water, and we’re expanding outward to build the vegetable production part of our farm dream. Then we’re continuing to expand our circle, finding support from and giving support to our neighbors. And we’re not stopping there.

That’s what Crock & Jar and our farm are all about – creating the connections in the web of local agriculture that will support us all together and help us all grow strong. We’re planting the seeds for our farm dream – a wholistic vision which helps us nurture ourselves and our urban and rural communities.

** Let’s Get Farming is our placeholder name, a call to action for ourselves and others. You can help us pick our real farm name in the next few days here.

Happy
Happy
0 %
Sad
Sad
0 %
Excited
Excited
0 %
Sleepy
Sleepy
0 %
Angry
Angry
0 %
Surprise
Surprise
0 %

RHUBARB VANILLA SPONGE CAKE

0 0
Read Time:2 Minute, 52 Second

A version of this post first appeared in the Spring 2015 issue of Sweet Paul Magazine.

Happy five year anniversary to Sweet Paul! What a beautiful five years it’s been. And Spring is a wonderful season in which to celebrate.

When Paul told me this was the anniversary issue, I naturally wanted to bake a cake – a fruit filled cake of course. And since this column is all about preserving the seasons I set out to create a jam worthy of a Sweet Paul celebration.

Rhubarb is one of my Spring favorites. Botanically a vegetable, rhubarb breaks the canning rule thatvegetables are low acid foods by being almost as acidic as citrus. As it cooks down this jam turns a brilliant shade of pink, the apples, sugar and vanilla add sweet and sultry notes, and the salt brings out the acidity. A rule breaker jam that’s beautiful, tangy and sweet – sounds like Paul to me!

Of course, you can enjoy this jam in a multitude of ways from topping toast to pairing with pork (Paul’s suggestion), and it is just sublime in an almond sponge cake with dark chocolate coconut ganache. See the full recipe for the jam and cake below.

Vanilla Rhubarb Jam
4 medium apples, peeled
7 cups diced rhubarb
1 ½ cups sugar
1 ½ teaspoons vanilla
¼ teaspoon salt

Core and finely chop or puree apples. In a wide saucepan, mix with rhubarb, sugar, vanilla and salt.

Cook over medium heat until the jam is thickened and starts to appear dry, about 20 minutes.

Cool jam and refrigerate. Or, to can the jam, pour it into warm, clean jars and process for 10 minutes in a boiling water bath.

Almond Sponge Cake
Yields 3 6-inch pans, 2 9-inch pans, or one bundt pan.

1/3 cup cold water
2 teaspoons vanilla
1 teaspoon lemon juice
zest of 1 lemon

1 cup almond flour
½ cup millet flour
1 teaspoon baking powder
½ teaspoon salt

6 eggs, separated
1 ½ cups sugar, separated

Heat oven to 350˚F.

Grease and flour pans.

In a small bowl, mix together the water, vanilla, lemon juice and zest and set aside.

in a separate bowl, sift the flours together with the baking powder and salt.

In a third large bowl, beat the egg yolks with 1 cup of the sugar until pale and fluffy.

Statring with the wet ingredients, stir the wet and dry ingredients into yolk mixture in stages, starting and ending with wet.

Beat the egg whites until stiff with ½ cup of the sugar.

Fold some whites into the yolk mixture and then add that mixture to the remaining whites.

Pour the batter into the prepared pans, tapping the pans to level them and bring any large bubbles to the surface.

Bake the cakes at 350˚ for 30 to 40 minutes or until the center of the cake just springs back to the touch.

Dark Chocolate Coconut Ganache
14 ounces good quality dark chocolate bar chopped in small chunks or chips
1 – 13.5 oz can coconut milk
1/2 teaspoon vanilla extract
pinch sea salt

Put chocolate in a large heat safe bowl.

Bring coconut milk just to a boil and pour over chocolate. Allow milk and chocolate to sit for about two minutes and then stir together.

Stir the milk and chocolate together until very smooth. Stir in the vanilla and salt.

Allow the ganache to cool for 5 to 10 minutes before glazing the cake.

Photography by Paul Lowe.

Happy
Happy
0 %
Sad
Sad
0 %
Excited
Excited
0 %
Sleepy
Sleepy
0 %
Angry
Angry
0 %
Surprise
Surprise
0 %

STRAWBERRY VANILLA SYRUP – IT’S PRIME TIME!

0 0
Read Time:1 Minute, 55 Second

It’s Strawberry Season! Time to bring some color to the table – not quite summer but it’s starting to feel that way.

When my wife and I first met, she hosted fairly regular parties at her Brooklyn apartment with her good friend Meena, who was often in charge of the bar area. When I came on the scene, Meena was also a gate keeper, Jane’s loyal, protective friend who could make or break our budding relationship. I had to win her over, and one of the many ways I attempted that was to break out the demo jars from all of my canning and fermentation workshops at parties. The liquid from brandied cherries, pears in syrup, and pickled blueberries, the brine from spicy ramps, pickled peppers, and half-sour cucumbers all made guest appearances at the bar. We totally upped our drinks game and everybody won. Meena was happy with all the new toys she had to play with at the bar, our guests loved the ever-changing cocktails at the party, and Jane and I were approved to continue dating.

You can make a fruit syrup with just about any kind of fruit, but strawberries are one of the jewels of the spring season. A syrup is an easy way to brighten up your day with their sweet flavor and striking color.

Strawberry Vanilla Syrup

Yields approximately 3 pint jars

3 pints strawberries, washed and hulled
¾ cup water
juice of ½ lemon
¾ cup sugar
½ vanilla bean, split & seeds scraped

  1. Cook the strawberries with the water and lemon juice over medium heat until they are soft.
  2. Puree the warm berries and strain through a wire mesh strainer to remove the seeds.
  3. Return the puree to your cleaned pan and add the sugar and vanilla seeds.
  4. Cook the mixture over medium heat until it is thickened, stirring frequently to avoid burning.
  5. Fill hot jars with syrup, cool, and store in the refrigerator for up to one month, or prepare canning jars and process in a hot water bath for 10 minutes.
  6. To serve, fill a glass with a shot (1 ½ to 2 ounces) of syrup, torn mint leaves and top with seltzer or prosecco. Stir to combine and enjoy!

A version of this column first appeared in Sweet Paul Magazine, Spring 2016.

Happy
Happy
0 %
Sad
Sad
0 %
Excited
Excited
0 %
Sleepy
Sleepy
0 %
Angry
Angry
0 %
Surprise
Surprise
0 %

SWEET BUNS WITH PLUM JAM (BUHTLE)

0 0
Read Time:3 Minute, 45 Second

A version of this column originally appeared in Sweet Paul Magazine, Fall 2016 issue.

In between high school and college, I had the privilege to study abroad for a year as an exchange student in Yugoslavia. I lived in a small town in Bosnia, back before the war when Yugoslavia still existed tenuously as a united country. Since I had already graduated from high school, my academic studies were not rigorous. However, the life lessons I learned, and the paths I started down in Yugoslavia have been fundamental to where I am today.

My host family (Mama, Tata and my sister, Sladjana) lived in a house on the edge of our small town with a yard full of produce and fruit trees. We raised chickens and pigs and my Mama cooked everything we ate. She spoke only a few words of English, so it was quite a while before we could have deep conversations. Though my understanding started small, she spoke to me often, encouraging me to listen and learn and laughing with me when we couldn’t quite make sense of each other.

Our meals and tasks at home were seasonal. In the spring we got chicks that we kept warm in a box in the garage. A few months later, all the neighbor women got together to help with the slaughtering. Similarly in the fall, the neighborhood came together for the pig slaughter. And around the same time, my host mother taught me to mill the plums from our trees to make plum jam. This thick, sticky jam was stored in our pantry and we would spread it inside warm palacinka (crepe like pancakes) and Mama would use it to fill sweet buns, called buhtle, for parties.

Today I farm with my wife and friends. As I did in Yugoslavia, we live very seasonally and food preservation is a cornerstone of my life. I stay in touch with my Yugoslav family through my host sister. Tata passed away last year, and I wish that I could see Mama, hug her and laugh together. By sharing her life with me, she has given me
one of the best gifts – the love of preserving and cooking seasonally, and the importance of staying connected to the land.

Mama’s Plum Jam
Yield: Approximately 3 pints

4 ½ pounds very ripe plums
2 cups water
5 cups sugar
pinch of salt
juice of 1 lemon

  1. Remove pits from the plums and cut into chunks. Or if you have a food mill like Mama, use it!
  2. Combine the plums and water in a large saucepan and bring to a boil over high heat. Reduce heat to medium and simmer, uncovered, for 1 hour.
  3. Add the sugar and salt to the pan and stir until the sugar dissolves. Increase heat to medium-high and  boil, stirring occasionally, for 25-45 minutes or until the jam is thick and dark. Stir in lemon juice.
  4. Cool and use to fill sweet buns or cookies or spread on toast. Or if canning, ladle into prepared 8 ounce jars and process in a hot water bath for 10 minutes.

Sweet Buns with Plum Jam (Buhtle)

1 pkt active dry yeast
1/2 cup lukewarm milk
3 cups (500 g) flour plus more for rolling
1/3 cup (80 g) sugar
½ teaspoon salt
zest of 1 lemon
1 egg
2 egg yolks
1/3 cup lukewarm water
1 cup plum jam
Butter or oil for coating buns and baking tray
Powdered sugar for sprinkling

  1. In a small bowl, mix the yeast with the warm milk and set aside to allow yeast to activate.
  2. In the bowl of a stand mixer, mix the flour, sugar, salt and lemon zest. Add the yeast mixture along with the eggs and water.
  3. Using the paddle attachment, mix the dough rapidly for a few minutes until a ball forms. The dough will be sticky.
  4. Cover bowl with a towel and leave in a warm place about 40 minutes to rise.
  5. Dust your work surface generously with flour and roll out dough to ½ inch thick. Cut into 16 rectangles and put 1 Tablespoon of plum jam on each.
  6. Pinch each rectangle around the filling and form into a ball making sure that it is tightly closed.
  7. Dip or brush each ball on all sides with melted butter or oil.
  8. Place them in a greased square pan and allow to rise for another 15 minutes. During this time, heat the oven to 350 degrees F (180 C).
  9. Bake buns in the preheated oven for 30-40 minutes.
  10. Serve warm and sugared.
Happy
Happy
0 %
Sad
Sad
0 %
Excited
Excited
0 %
Sleepy
Sleepy
0 %
Angry
Angry
100 %
Surprise
Surprise
0 %